Step 1 - Tools needed - pipe
wrench, crescent wrench, spring tube benders, pipe cutter, pipe flaring
tool, allen wrench, soldering equipment, file, and screw driver. Obtain
all your parts and tools needed for the conversion ahead of
time.
(Click
here for Parts List at bottom)
Most professional
plumbing supply stores stock higher quality parts compared to large home
centers cheap plumbing parts. The savings aren't that much on a small
project like this. The most crucial quality part is on the inner pipe,
problems arise from inconsistent wall thickness, out of roundness, thick
weld seams, etc on low quality pipe.
|

(1) Tools Needed
Click to enlarge in new window.
1
| 2
| 3
| 4
| 5
| 6
| 7
| 8
| 9
| 10
| 11
| 12
| Final
|
Step 2 - Strip
down the engine removing the gas tank, muffler, and carburetor. Remove the
mower blade and replace with a 12" diameter steel disk flywheel of the
same thickness as the blade for safety.
|
(2) Stripped Engine
Click to enlarge in new window.
1
| 2
| 3
| 4
| 5
| 6
| 7
| 8
| 9
| 10
| 11
| 12
| Final
|
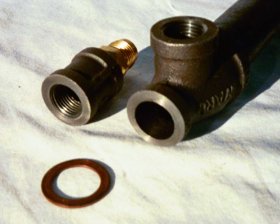
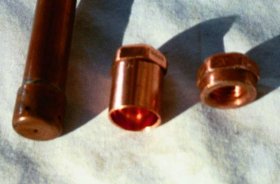
Step 3 - Take
the 1"x1/2"x1/2" reducing tees and mount them on a 1" nipple (short pipe),
and then using a lathe, machine the end smooth and fly cut (bore out) the
hole in the end 27/32" (21mm) so that the 1/2" inner pipe will slide
inside. This procedure can also be done by using a drill press to drill a
27/32" or 7/8" hole in the end of the tee and then use a file to smooth
the roughness off.
The 1/2" pipe connector and 1/2" tee will each
need to have one end smoothed off as well to receive the copper washers as
a tight seal. If anyone has a machine shop that would like to do this for
others, contact GEET. We might also offer a complete kit that has all the
parts ready to be assembled in minutes if there's enough
interest.
|
(3) Tee &
Connector
Click to enlarge in new window.
1
| 2
| 3
| 4
| 5
| 6
| 7
| 8
| 9
| 10
| 11
| 12
| Final
|
Step 4 - Have a
plumber or plumbing center cut your inner reactor 1/2" pipe to 16 + 7/16"
and thread both ends. Use Black Pipe here because galvanized pipe gives
off toxic fumes if heated too much. File the 12" x 1/2" multi-fuel steel
rod to a bullet point on one end only. (7 + 3/8" x 1/2" for gasoline only)
This will keep you out of trouble later if you can't remember which way
the rod points. The engine will not run if the rod is put in backwards
after it has a magnetic signature.
Assemble the parts in order as
in the above picture using the 7/8" / 22mm copper.washers used in oil
drain plugs for cars. (2 - 1"x1/2"x1/2" machined reducing tees joined by
the 12" long 1" nipple, slide the 16 + 7/16" long 1/2" reactor pipe
inside, add a copper washer on each end and then add the 1/2" connector
and 1/2" tee.)
|

(4) Plumbing Pipes &
Rod
Click to enlarge in new window.
1
| 2
| 3
| 4
| 5
| 6
| 7
| 8
| 9
| 10
| 11
| 12
| Final
|
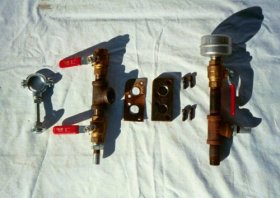
Step 5 -
Assemble the other valve component subassemblies above. The 1/2" thick
steel intake / exhaust adapter plate above is used only on some engines
like "Tecumseh" and Overhead Valve Engines (picture 9).
Some
"Briggs and Stratton" engines, etc usually already have the exhaust
threaded for 1/2" pipe, but the intake is on the other side of the engine
causing longer hose runs. Also a compression pipe connector or a piece of
rubber hose with clamps will need to be connected from the engine
intake to the Bubbler pipe.
(1/2" valve (Air Mixture Valve), 1 1/2"
x 1/2" nipple, 1/2" tee, 1 1/2" x 1/2" nipple, 1/2" valve (Throttle
Valve), 1/2" to 1/4" pipe reducer bushing, half of 3" x 1/4" nipple.) and
(Muffler, 1/2" ball valve (Optional - Back pressure valve), 3" x
1/2" nipple, 1/2" tee, 1/2" to 1/4" pipe reducer bushing, half of 3" x
1/4" nipple, 1 1/2" nipple.)
|
(5) Valve
Components
Click to enlarge in new window.
1
| 2
| 3
| 4
| 5
| 6
| 7
| 8
| 9
| 10
| 11
| 12
| Final
|
Step 6 -
Assemble the sub-assemblies onto the reaction chamber above making sure to
install the 12" rod inside pointed away from the engine. Now it's time to
start on the bubbler.
|
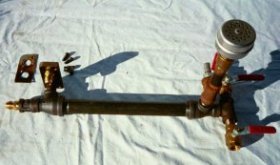
(6) Finished
Reactor
Click to enlarge in new window.
1
| 2
| 3
| 4
| 5
| 6
| 7
| 8
| 9
| 10
| 11
| 12
| Final
|
|
|
Step 7 - Take
10 3/4" x 1/2" copper pipe and solder a copper 1/4" NPT - 1/2" pipe
adaptor on one end and a 1/2" cap on the other. Drill a 1/16" hole through
the cap, turn 90 degrees and drill through again, also one up through the
bottom. Take the other 1/4" NPT - 1/2" adaptor and cut off the thinwall
portion to make a pipe nut and file smooth for inside the Anti-Freeze
jug.
|
(7) Bubbler End & Pipe
Nut
Click to enlarge in new window.
1
| 2
| 3
| 4
| 5
| 6
| 7
| 8
| 9
| 10
| 11
| 12
| Final
|
Step 8 - Take a
1 gallon anti-freeze jug and drill a 1/2" hole near the top of the jug and
through the cap as illustrated. Assemble the parts together in the
following order. (Hose, half of 3" x 1/4" nipple, 1/4" pipe connector,
short 3/4" nipple, bushing, hole in jug, bushing, and pipe nut.) and (
(Optional - Back Pressure Hose), half of 3" x 1/4" nipple, 1/4" pipe
elbow, short 3/4" nipple, bushing, hole in jug cap, bushing, and soldered
pipe.)
|
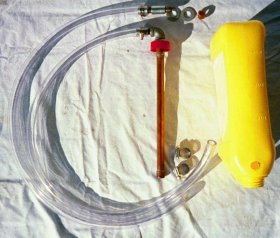
(8) Bubbler &
Hoses
Click to enlarge in new window.
1
| 2
| 3
| 4
| 5
| 6
| 7
| 8
| 9
| 10
| 11
| 12
| Final
|
Step 9 - The
port adapter was formed by cleaning the intake and exhaust ports off. Then
dipping a finger in the exhaust port to get some soot to rub on wide
masking tape taped over the ports. This then leaves a perfect template to
then tape into a 1/2" thick piece of steel, then drill the mounting
and the port holes and tap the ports with a 1/2" NPT thread
tap.
|
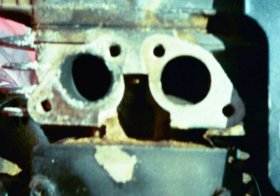
(9) Exhaust &
Intake
Click to enlarge in new window.
1
| 2
| 3
| 4
| 5
| 6
| 7
| 8
| 9
| 10
| 11
| 12
| Final
|
Step 10- Use
1/2" tubing for 10 HP or less (* 5/8" tubing and flare fittings for 10-20
HP) with a 1/2" tubing spring bender and form a loop, then remove the
spring. Slide the flare nuts on each end, and then slide the flaring tool
on so that the pipe sticks out about 3/16", make the flared ends.
(Air-Conditioning supply houses carry flare fittings if you have
difficulty finding them.)
|

(10) Tubing Loop
Click to enlarge in new window.
1
| 2
| 3
| 4
| 5
| 6
| 7
| 8
| 9
| 10
| 11
| 12
| Final
|
|
|
Step 11 -
Assemble all the parts onto the engine, and then add a 1" pipe support or
1 1/4" exhaust hangar. Fill the bubbler up no more than 1/4 full till you
get used to using it (up to half full later), have someone steady the jug
while starting the engine so it doesn't spill into the hoses. If wet fuel
gets on the reaction rod it will stop running, you'll have to dry your rod
and hoses out. You can hang it from the mower handle if you like later
after it's started.
You must point the exhaust end of the rod due
North while starting the engine the first time and let it run for 30 min
to "burn in the rod". The rod will self center magnetically by itself
after it's running or you can weld three bumps on each end to center the
rod (file them to fit snugly).
Leave the optional back pressure
valve open, open the throttle and mixture valve about halfway, and start
the engine by varying the air mixture valve.
Then slowly increase
the throttle wide open while adjusting the air mixture valve. Make sure to
paint all external pipes and connectors with High Temperature Grill Paint
or they will rust very quickly. (Except copper, brass or
galvanized)
|

(11) Finished
Conversion
Click to enlarge in new window.
1
| 2
| 3
| 4
| 5
| 6
| 7
| 8
| 9
| 10
| 11
| 12
| Final
|
Step 12 - For
an installation on a generator, you can also use 90 degree elbows to keep
the pipes within the cage. Mount the GEET Fuel Processor as far away as
possible from the generator magnetic field so they do not interfere with
each other. Also be very careful with credit cards in your pockets or
video cameras, etc from getting too close to the engine while it's running
so they won't be erased.
|
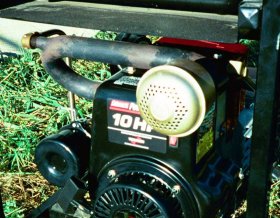
(12) 5 kW GEET
Generator
Click to enlarge in new window.
1
| 2
| 3
| 4
| 5
| 6
| 7
| 8
| 9
| 10
| 11
| 12
| Final
|
Finally - Experiment with the optional Back
Pressure valve to run closed loop on heavy fuels, different materials for
the inner pipe and reaction rod. Different rod lengths and also
threaded rods, engine side of the reactor locations for the air mixture
and/or throttle valves, exhaust heated copper tubing from the bubbler to
the throttle valve, 5 gallon bubblers, double bubblers for non-soluble
fuels, vacuum gages, etc, etc, and also "alternative fuels".
The
beauty of this design is that it can be reconfigured in minutes.We plan to
set up a 900 number shortly for technical questions, no calls or technical
information will be taken at the main number. We also set up a newsgroup and
FAQ for experimenters to exchange information and new discoveries. Have
fun with it and let us know how it works out!
1
| 2
| 3
| 4
| 5
| 6
| 7
| 8
| 9
| 10
| 11
| 12
| Final
|