A small sampling of Technical Excerpts from BlastIt!
the Rife & Bio-Energetics Researchers book
KeelyNet 01/26/02 Description of BlastIt book contents BlastIt Rife & Bio-Energetics Researchers book
$99.95 + S&H for 746 pages, nearly 5 pounds of details
Original Research details from Blast It!
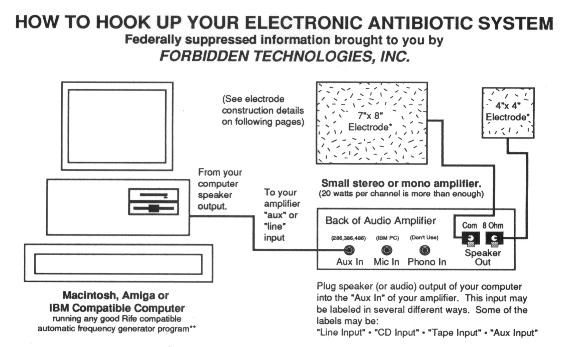
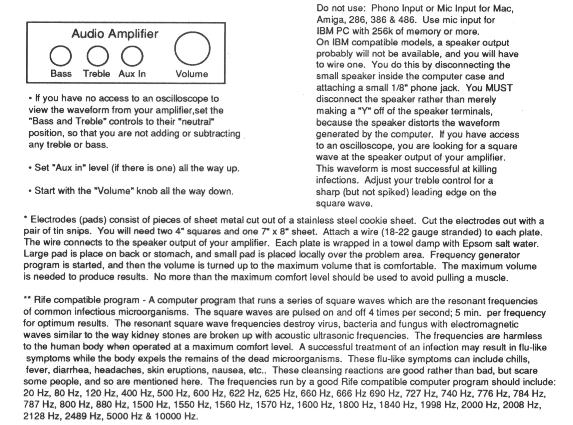
HIGH VOLTAGE AC The BK Generator produces 20 volts, which is good for all suggested radio frequencies in Blast It! However, it does not “blast” the deep tissue critters well. That’s why some experimenters have devised an alternative method to use when more voltage is desired. This alternative method steps up the penetration of the frequencies into the body. The Rife signal can be amplified by linking a BK generator with a Radio Shack MPA 50 amplifier, rated at 40 watts, and a standard 12-volt automotive ignition coil. The ignition coil ups the voltage from between 20-30,000 volts. Caution: Use caution when adding an automotive coil to your set-up. This high voltage set-up allows better tissue penetration, but packs a large wallop! Hooking up a High Voltage System
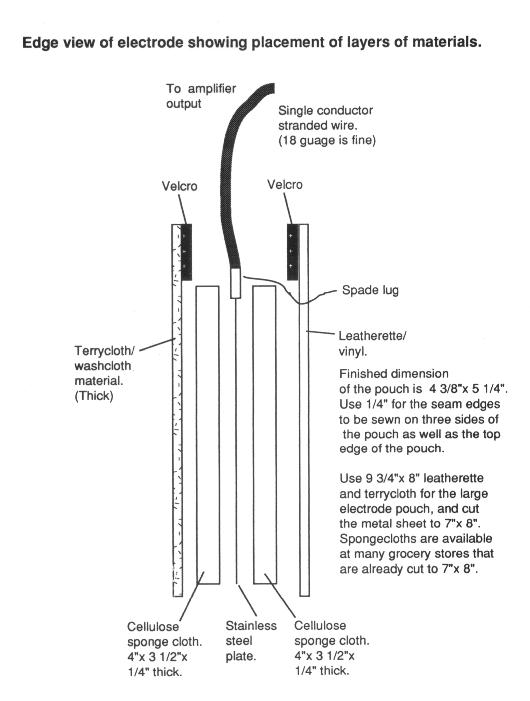
1. Get a 40-watt MPA50 Audio Amplifier from Radio shack.Wire #1: 18-gauge, 18-inch long cord. Goes from Com (Common) or Ground on the back of the MPA50 Audio Amplifier to the NEG side of the automotive coil. Wire #2: 18-guage, 8-foot long cord. Splice this into Wire #1. Goes from the splice into the GROUND pad. Wire #3: 18-gauge 8-foot long cord. Goes from the center of the coil to a HOT pad or to a tube.
2. Get a BNC to RCA cable from Radio Shack.
a. The BNC plug hooks into the Output on the front of the BK.3. The Output is 3 wires.
b. The RCA plug hooks into the Auxiliary on the back of the Audio Amplifier. Set the slide switch on the back of Amplifier to Auxiliary.
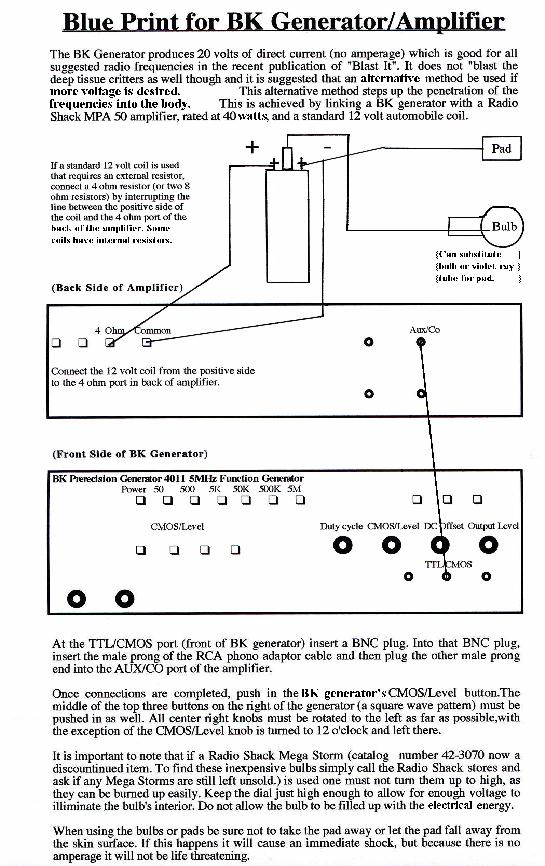
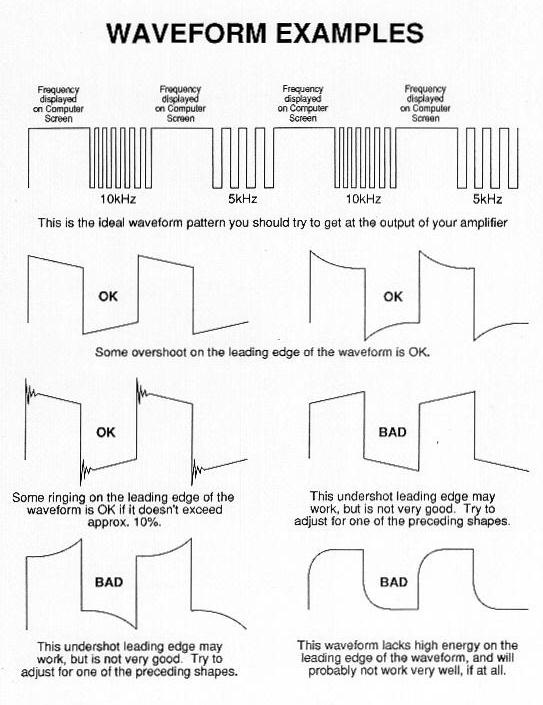
Check your work At the TTL/CMOS port (front of BK generator) insert a BNC plug. Into that BNC plug, insert the male prong of the RCA phono adapter cable and then plug the other male prong end into the AUX/CO port of the amplifier. Once connections are completed, push in the BK generator’s CMOS/Level button. The middle of the top three buttons on the right of the generator (a square wave pattern) must be pushed in as well. All center right knobs must be rotated to the left as far as possible, with the exception of the CMOS/Level knob, which is turned to 12 o’clock and left there. Choice of pads or tubes This configuration works very well with standard electrode pad set-up. Some experimenters have used a Radio Shack Mega Storm bulb. However, this bulb, catalog number 42-3070 is now a discontinued item. To find these inexpensive bulbs simply call the Radio Shack stores and ask if any Mega Storms are still left unsold. When using this bulb, it is important to not turn it up too high, as it can be burned up easily. Keep the dial just high enough to allow for enough voltage to illuminate the bulb’s interior. Do not allow the bulb to be filled up with the electrical energy. Renulife violet ray tubes (or comparable) can be found on E-bay by doing a search for “violet ray” or “Renulife.” When you use this bulb you will have to make a homemade hook-up. Get a piece of 1/2-inch or 3/8-inch copper tubing, cut a slit down two sides about 1-1/2 inches. Force the electrode part of the Renulife into the slit part of the copper tubing, and then solder a wire to the other end for your connection to the high voltage coil. Wrap well with electrician’s tape for insulation. Caution when using the bulbs or pads: Be sure not to take the pad away or let the pad fall away from the skin surface. If this happens it will cause an immediate shock, but because there is no amperage it will not be life threatening.Free Blaster5 software and DIY setup details Mark Simpson Rifeway article Rife Files Index KeelyNet loader page
If you found this file useful or interesting, please consider a donation or a purchase to help keep KeelyNet online and providing free information. Even a dollar will help. Others sell it, we prefer to share it, thanks!